My Niece

Thanks

It was time for a change on my blog yet again and I would love to say thank you to my sis LoneShellCreations for her help with my blog. The kit I am using in my layout came from http://oopsiedaisy2u.blogspot.com/

Any Taggers Kits are 800 x 800 px, and be stated in the title of the post.
Any Full Sized Kits are 12x12 inch, will not be stated in the post title.


Showing posts with label Tutorials. Show all posts

Saturday, March 7, 2009

I have a new tutorial


If you wish to do the tutorial you may find it at
http://www.freewebs.com/loneshellcreations/index.htm.

Saturday, August 16, 2008

Lost


This tutorial is from my thoughts, any resemblance to another tutorial is purely coincidence.
This tutorial is made with Paint Shop Pro version 9.
It is for Beginners to Intermediate level.


Materials:
Paint Shop Pro
Paradox Scrap Kit by Eklectik Kolord Dreams It's A PTU kit.
My fabric paper's (supplied in materials)
A mask (supplied in materials)
2 Tubes of choice or use mine(supplied in materials)
A word art of choice or use mine(supplied in materials)
Materials


Preparations for the tutorial:
Put the mask into you mask folder.
Open your tubes, two papers from a the scrap kit,
open one of the fabric papers included in the materials,
A frame or a slide,
And open the two flowers. Minimize everything.


Step One

Open a new image 800 x 800, minimize the image, maximize one of the papers from the kit.
Edit/Copy, close out of this paper.
Edit/Paste/Paste as a new layer.
Image/Resize with these settings:

Layers/load save mask with these settings:

Layers/Merge/Merge Group.
Effects/ 3d Effects/Drop Shadow with these settings 2 times:


Step Two:


Minimize your image you are working on, maximize your second paper from the kit.
Edit/Copy, close out of this paper.
Maximize your image you are working on Edit/paste/Paste as a new layer.
Image/Resize with the following settings:

Image/Resize again with these settings:


Step Three

Minimize your image that you are working on,
Maximize your fabric paper you chose.
Edit/Copy, close out of this paper.
Maximize your image that you are working on,
Edit/Paste/Paste as new layer.
Image/Resize with these settings:


Step Four

Minimize your image that you are working on,
Maximize your frame/slide tube.
Edit/Copy, close out of this tube.
Maximize your image you are working on,
Edit/Paste/Paste as a new layer.
Image/Resize with the following settings 2 times:

Move with the mover tool to the upper left corner of your paper layers.


Step Five

Minimize your image you are working on,
Maximize one of your tubes( I chose the male one).
Edit/Copy, Close out of this tube.
Maximize your image, Edit/Paste/Paste as new layer.
Layers/Arrange/Move down.
With your mover tool, move this tube underneath the frame/slide.
In your layer palette select your frame/slide layer.
With the magic wand click the inside of the frame/slide.
Selections/Modify/Expand with these settings:

Now select your tube layer in the layer palette.
Selections/Invert.
Hit the delete key on your keyboard 1 time.


Step Six

Minimize your image you are working on,
Maximize your other tube.
Edit/Copy, close out of this tube.
Maximize your image.
Edit/Paste/Paste as a new layer.
(if you need to resize your tube you may do so now).
With your mover tool move your tube into
The lower right hand corner (Look at my finished image for placement)


Step Seven

Minimize your image you are working on, maximize your word art.
Edit/Copy, close out of this tube.
Maximize your image.
Edit/Paste/Paste as a new layer.
If you feel the need to resize your word art you may do so now.
Mine was a little small for me, so I used the deformation tool.


Step Eight

Minimize your image you are working on, maximize one of your flower tubes.
Edit/Copy, close out of this tube.
Maximize your image.
Edit/Paste/Paste as new layer
Image/Resize 2 times with the following settings:

With your mover tool move this into the left hand corner
(take a look at my graphic for position)


Step Nine

Repeat step eight with your other flower tube.


Step Ten

Add any copyright information.
Layers/Merge/Merge all Flatten
Image/Resize with the following settings:

Save as JPG.

Saturday, August 9, 2008

Come Here


This tutorial is my creation, any resemblance to another tutorial is purely coincidental. Please do not copy it as it is copyrighted by me. You may make a copy of it for personal use only to use offline.

Materials:
Paint Shop Pro
My newest scrap-kit Girls Rock Tagger Sized
A tube of your choice
My supplies include a tube, and the two masks
Supplies

Step One

Open your tube, two papers, a frame, one of the be-ribboned buckles, put the masks into your masks folder of psp, a bow, and a beaded word art I have put 2 in the kit one has words on it the other doesn’t.
Open a new image 600 x 600.
Maximize one of your papers, edit/copy, go to your new image edit/paste as new layer. Close out of your paper.
Layers/load\save mask find the mask dsbk_funkyflower and use these settings:
Fit to layer, source luminance, and show all mask

(optional you may add a drop shadow to this layer.)

Layers/merge/Merge group
Image/resize 110 percent 2 times.


Maximize your other paper, edit copy, and go to your new image edit/paste as new layer. Close out of your paper. Layers / load\save mask find the mask dsbk_pinkedcircle and use these settings:
Fit to layer, source luminance, show all mask, and invert transparency checked.


Layers/merge/Merge group
Effects/3d Effects/ Drop shadow with these settings:
0,0,80,10, black


Step Two


Maximize your tube. Edit/ copy, go to your image edit/ paste as new layer. Close out of your tube.
Now if your tube is a little big you might need to resize it if so do it in 80 percent increments.
Maximize your frame tube. Edit/copy, go to your image edit/paste as new layer. Close out of your frame.
Now click the mover tool, and move your tube to a position you like inside the frame.
It should look similar to this:


Now go back to your frame layer click the magic wand tool and select the inside of the frame.
Selections/Modify/Expand by 2.


Selections/Invert.
Now go down to your tube layer and hit the delete key one time.
Your image should now look similar to this:


Click your frame layer Layers/Merge/Merge down.
Selections/Select None
Step Three


Maximize your bow tube. Edit/copy, go back to your image edit/paste as new layer. Close out your bow tube.
Image/resize with these settings:


80 percent, 80 percent.
Click the mover tool. Move your bow to the top of your frame.
Effects/3d Effects/Drop shadow with these settings:
0,0,80,10, black

It should now look similar to this:

Screenshot9
Maximize your ribboned buckle. Edit/copy go to your image edit/paste as new layer. Click the mover tool and move your buckle tube across your image into a position that looks good to you.
Maximize your beaded word art. Edit/copy go to your image edit/paste as new layer.
In your layer pallet move this layer below your bow layer.
Resize your beaded word art with these settings:

Two times.
Now click your mover tool. And move it below the bow till it looks good to you.
Image/rotate/free rotate with these settings:

If you choose the beaded word art with words on it skip this step if not continue on.
Click your text tool choose your size and font. Now type what you would like your word art to say.
Image/rotate/free rotate.
Keep the same settings just change the direction from right to left.
In the layer pallet right click on this layer, Convert to raster layer. If it doesn’t fit over your beaded word art you will need to resize it.
Now click the mover tool and move over your beaded word art.
(Optional: You may add drop shadows to the beaded word art and beribboned buckle if you so wish.)

Layers/Merge/Merge down.

Step Four


Add your watermark/copyright information.
Click the text tool add your name or names.
Layers/Merge/Merge All Flatten.
Save as .jpg.
I hope you enjoyed this tutorial as much as I enjoyed creating it.

Thursday, July 31, 2008

Thinking Hard

Photobucket


This tutorial is the creative property of Designs by Katie. Any similarities to another tutorial are purely coincidental.
Materials
Masks
Paint Shop Pro
Tube of choice I am using the beautiful work of Popeye Wong
Scrap kit of choice I am using Chic by Bel Vidotti
Font of choice the font I am using is WaterBrushRob, I didn’t include it because it’s a pay font.
Put the masks into your psp masks folder.
If you are not using the beautiful kit by Bel Vidotti, it is suggested you have a lace up tube and frame open.


One
Open 2 papers of choice, 2 flowers of choice, 2 gems of choice, an accent of choice, tube of choice, and a lace up of choice. Open a new image 600 x 600 px. Maximize one of your papers. Copy and paste into your new image. Layers/load save mask with these settings:Photobucket
Layers/merge/merge group. Close out of your paper.


Two
Maximize your second paper. Copy and paste into your image. Layers/load save masks with these settings:
Photobucket

It should now look similar to this:Photobucket

Image/resize with the following settings:
Photobucket

Take the eraser tool and delete the line around the outside edge.
It should now look similar to this:Photobucket

Move into position (check the finished image for positioning). Effects/3d Effects/Drop Shadow with the following settings:Photobucket

Close out of the paper you used.


Three
Maximize your frame tube. Copy and paste into your image, image/resize 3 times with these settings:
Photobucket


It should now look similar to this:
Photobucket

Image/rotate with these settings:

Move into position (check positioning against the finished graphic above.) Close out of your frame tube.
Duplicate the frame layer 2 times.
Move the frames one at a time into position (look at the finished image to get an idea of how to position them.)
Layers/Merge/Merge down. Layers/Merge/Merge down.


Four
Maximize you tube. Copy and paste into your image. Layers/arrange/move down.
Image/resize with these settings:
Photobucket

Duplicate the tube layer 2 times. Minimize your tube for later use.
Move your tube layers into a position that looks good to you.
In your layer palette click on the frame layer. Click the inside of the first frame, selections/modify/expand by 5. Selections/invert
Click the corresponding tube layer in your layers palette. Hit delete once.
In your layer palette click on the frame layer. Click the inside of the Second frame, selections/modify/expand by 5. Selections/invert
Click the corresponding tube layer in your layers palette. Hit delete once.
In your layer palette click on the frame layer. Click the inside of the third frame, selections/modify/expand by 5. Selections/invert
Click the corresponding tube layer in your layers palette. Hit delete once.
It should look similar to this:
Photobucket


Five
Maximize your lacing tube. Copy and paste into your image. Close out the lacing tube. Image/resize with these settings 2 times:Photobucket

Then image/resize with these settings one time:
Photobucket

Image/rotate with these settings:
Photobucket

Position over frame layer 1.
Duplicate this lacing layer 1 time and move over the other frame.
(See positioning from finished image.)
It should look similar to this:
Photobucket


Six
Maximize one of your gem tubes, copy and paste into your image. Close the gem tube out
Image/resize with these settings 2 times:
Photobucket

Move into position over lacing and frame.
(See the finished image for positioning.)
Maximize your other gem tube. Copy and paste into your image.
Resize with above settings 2 times.
Move into position over lacing and frame.
(See the finished image for positioning.)


Seven
Maximize your accent tube. Copy and paste into your image. Close out the accent tube.
Image/resize with these settings 2 times:Photobucket

Move into position. (see finished image for positioning.)
Raster deformation tool, give it a slight slant if you would like.
It should look similar to this:Photobucket


Eight
Maximize your tube, copy and paste into your image.
Resize with the 80 percent settings 2 or 3 times depending on the size of your tube. Position (see the finished image for positioning).
Maximize one of your flower tubes. Copy and paste into your image.
Image/resize with the 50 percent settings 2 times.
Move into position (see the finished image for positioning).
Close out of the flower you used.
Open your other flower tube, copy and paste into your image. Close out of the flower tube you used.
Move into position (see the finished image for positioning).


Nine
Click the text tool pick the font you wish to use. Size 72 or smaller depending on what you wish to type. Type what you wish.
Add a slight angle to the text if you wish.
Effects/3d Effects/Drop Shadow with these settings:Photobucket

Add your copyright information.
Layers/Merge/Merge All Flatten.
Save as JPG.
Hugs,
Photobucket


Tuesday, July 15, 2008

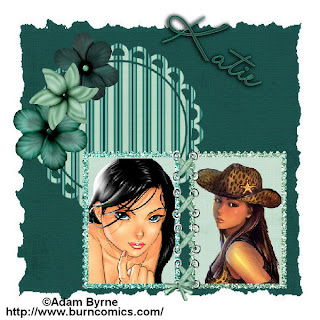
Come On Baby Scrap Tag Tutorial


Come On Baby

This tutorial is copyrighted by Designs by Katie, any similarities to another tutorial is purely consequential. If you have any questions please ask.


Supplies:
Two tubes I am using the beautiful artwork of ©Adam Byrne.
Scrap kit of choice I am using the kit Acqua by Bel Vidotti
Mask Becky_mask001.jpg included in supplies
Mask image 0011 included in supplies
Font of choice I am using LainieDaySH
Supplies
Paint Shop Pro

If you wish to have a written copy of this tutorial you may get it here


One
Put the masks in your mask folder in Paint shop pro.
Open two tubes you wish to use minimize them for now. Open three papers, 3 flowers, a vine, a lace up, and two frames you wish to use and minimize them all. Open a new image 600 x 600 pixel 72.000 resolution.
Two
Copy one of the three papers and paste into your image. Use Becky_mask001.jpg with the following settings.
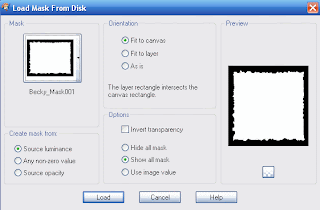
Merge Group.

Three
Copy another paper, and paste it into your image. Use mask image0011 with these settings.
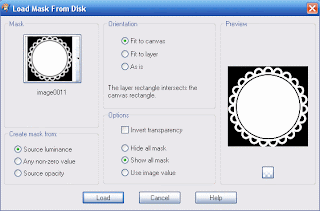

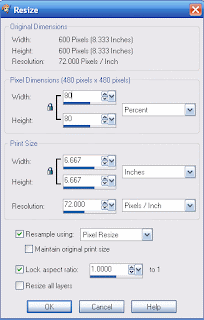
Merge group. Resize with these settings.
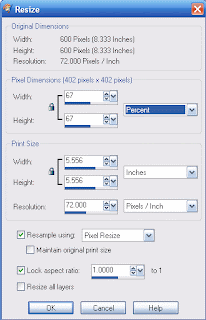


Resize again with these settings.


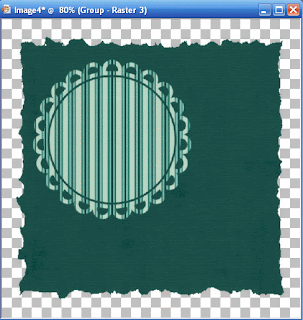
Move to the upper corner as shown in the image below.


Four
Open one of the frames copy and paste into your image. Resize by 80 percent x 2 (you may have to tweak it too look like the below image) percent. Open the other frame copy and paste resize by 80 percent x2. It should look like this.
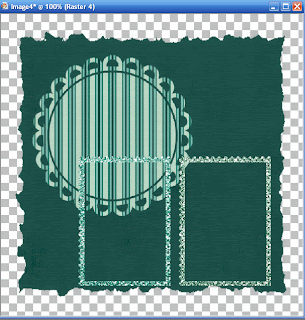


Five
Open up the laces tube that you have chosen. Resize it down to about right to fit over the frames. If you need to use the raster deform. It should look like this.
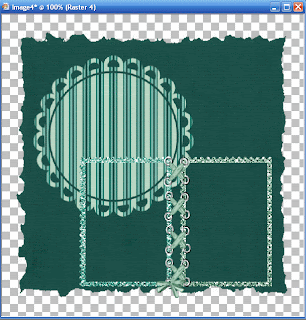

Six
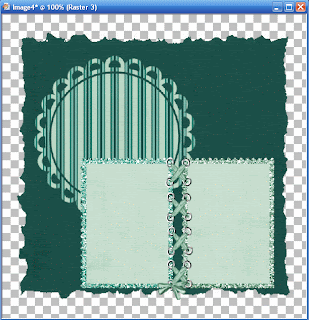
Click in your menu Layers/Merge down the frames and lace ups. Maximize paper three, open your image add layers/new raster layer with the inside of the frames selected, selections/modify/selection/expand by 7 paste into selection, selection/select none. Move this raster layer below the frames layer. Close out of the paper you opened. It should look like this now.

Seven
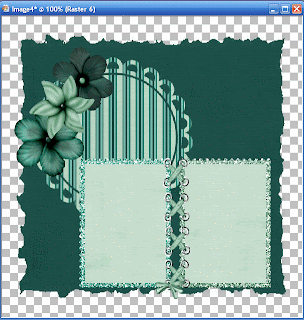
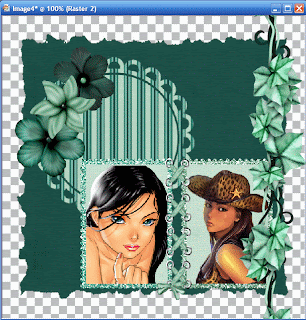
Open the flowers copy them and then paste into your image. Resize the flower by 35 percent and move it to the top of the circle. Copy the second flower and then paste into your image. Resize flower by 35 percent and move on top of the other flower. Copy the third flower and then paste into your image. Resize the flower by 35 percent and move on top of the other flowers. It should now look like this.


Eight
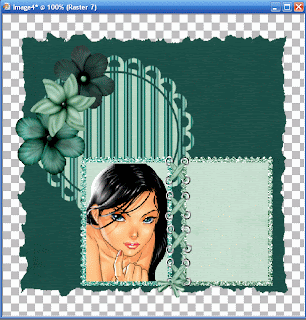
Open one of the tubes you have chosen, copy then paste into your image move it below your frame layer. Resize (I used 80 percent 2x) till the head of the girl is in the frame. Select the frame layer click the wand and click inside both sides of the frame, selctions modify and expand by 3. Select your tube layer and invert selection hit delete. It should now look like this.

Nine
Open your other tube. Copy then paste into your image, resize the same way as in Step 8, Select the frame layer, select the inside of the other frame, selections modify expand by 3, invert. Select the tube layer hit delete. It should look like this.
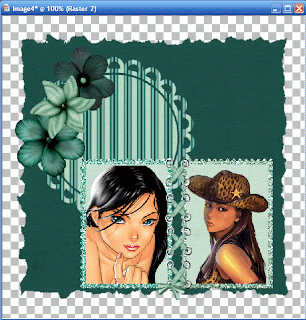
Maximize the vine, copy and paste into your image. Resize the vine to fit over your frame (if you want you may leave off the vine.)It should look like this if you used the vine.
Put your copyright information if you have it. Flatten image. Click the eyedropper and pick a light and dark color from you scrap kit. Click the text tool and pick your font that you want to use (again I used LainieDaySH). Add your text. Save image as .Jpg.
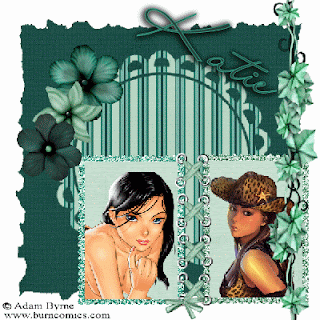

Hope you enjoyed this tutorial.
Hugs,
Katie