
This tutorial is from my thoughts, any resemblance to another tutorial is purely coincidence.
This tutorial is made with Paint Shop Pro version 9.
It is for Beginners to Intermediate level.
Materials:
Paint Shop Pro
Paradox Scrap Kit by Eklectik Kolord Dreams It's A PTU kit.
My fabric paper's (supplied in materials)
A mask (supplied in materials)
2 Tubes of choice or use mine(supplied in materials)
A word art of choice or use mine(supplied in materials)
Materials
Preparations for the tutorial:
Put the mask into you mask folder.
Open your tubes, two papers from a the scrap kit,
open one of the fabric papers included in the materials,
A frame or a slide,
And open the two flowers. Minimize everything.
Step One
Open a new image 800 x 800, minimize the image, maximize one of the papers from the kit.
Edit/Copy, close out of this paper.
Edit/Paste/Paste as a new layer.
Image/Resize with these settings:
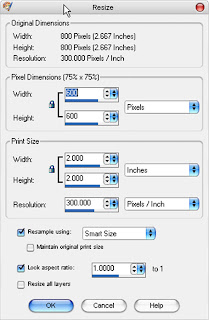
Layers/load save mask with these settings:
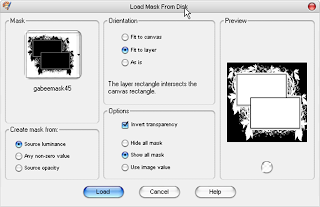
Layers/Merge/Merge Group.
Effects/ 3d Effects/Drop Shadow with these settings 2 times:
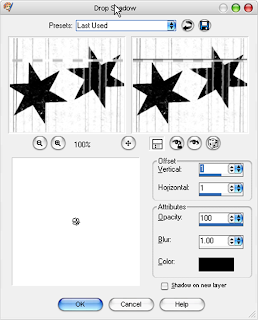
Step Two:
Minimize your image you are working on, maximize your second paper from the kit.
Edit/Copy, close out of this paper.
Maximize your image you are working on Edit/paste/Paste as a new layer.
Image/Resize with the following settings:

Image/Resize again with these settings:
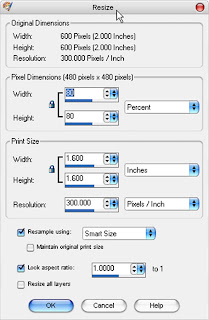
Step Three
Minimize your image that you are working on,
Maximize your fabric paper you chose.
Edit/Copy, close out of this paper.
Maximize your image that you are working on,
Edit/Paste/Paste as new layer.
Image/Resize with these settings:
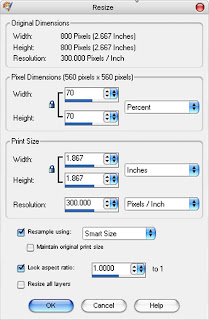
Step Four
Minimize your image that you are working on,
Maximize your frame/slide tube.
Edit/Copy, close out of this tube.
Maximize your image you are working on,
Edit/Paste/Paste as a new layer.
Image/Resize with the following settings 2 times:

Move with the mover tool to the upper left corner of your paper layers.
Step Five
Minimize your image you are working on,
Maximize one of your tubes( I chose the male one).
Edit/Copy, Close out of this tube.
Maximize your image, Edit/Paste/Paste as new layer.
Layers/Arrange/Move down.
With your mover tool, move this tube underneath the frame/slide.
In your layer palette select your frame/slide layer.
With the magic wand click the inside of the frame/slide.
Selections/Modify/Expand with these settings:
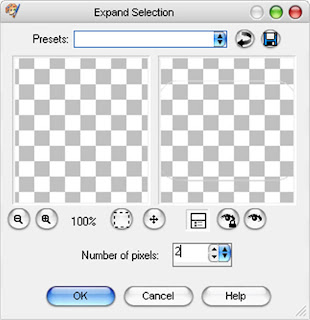
Now select your tube layer in the layer palette.
Selections/Invert.
Hit the delete key on your keyboard 1 time.
Step Six
Minimize your image you are working on,
Maximize your other tube.
Edit/Copy, close out of this tube.
Maximize your image.
Edit/Paste/Paste as a new layer.
(if you need to resize your tube you may do so now).
With your mover tool move your tube into
The lower right hand corner (Look at my finished image for placement)
Step Seven
Minimize your image you are working on, maximize your word art.
Edit/Copy, close out of this tube.
Maximize your image.
Edit/Paste/Paste as a new layer.
If you feel the need to resize your word art you may do so now.
Mine was a little small for me, so I used the deformation tool.
Step Eight
Minimize your image you are working on, maximize one of your flower tubes.
Edit/Copy, close out of this tube.
Maximize your image.
Edit/Paste/Paste as new layer
Image/Resize 2 times with the following settings:

With your mover tool move this into the left hand corner
(take a look at my graphic for position)
Step Nine
Repeat step eight with your other flower tube.
Step Ten
Add any copyright information.
Layers/Merge/Merge all Flatten
Image/Resize with the following settings:
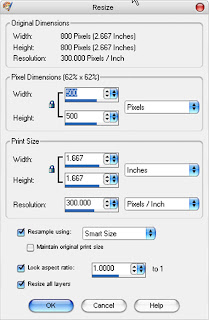
Save as JPG.


No comments:
Post a Comment